rodo
A simple todo list tool for people who live on the command-line
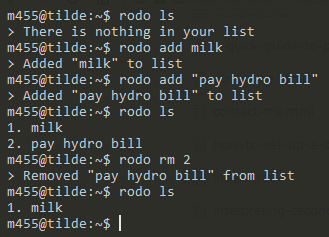
Screenshot
New things added!
Now the default directory and todo list file have better default permissions:
~/.rodo/is set to 700 by default~/.rodo/todo.txtis set to 600 by default.
Todos
- Add color option to
config.rktfile - Encrypt
todo.txtfile
TL;DR
Run ./rodo.rkt or, if you want an executable, run raco exe rodo.rkt to
compile the project into a single executable file
Table of Contents
Platforms
Below is a list of platform(s) that rodo is currently available for.
- GNU/Linux
Requirements
Below is a list of items needed for running rodo on your machine.
Downloading
Choose one of the two options from the following sections below.
Option one: via Git
Run the command below to download rodo using the git command.
git clone https://github.com/m455/rodo
Option two: via GitHub on a web browser
Follow the steps below to download rodo from your web browser.
- Click the Clone or download button at the top of this page
- Click Download ZIP from the drop-down list
Setup
Follow the sections below to set up rodo, so it can be used from anywhere on
your system.
Tip: If you just want to test rodo out, then just cd into the directory you downloaded
rodo into, and then run ./rodo.rkt.
GNU/Linux
Follow the sections below to add rodo to your $PATH, if you are using
GNU/Linux.
Set up a $PATH
Follow the steps below if you haven't set up a $PATH.
Tip: If you have set up a $PATH already, then skip to the next step, Adding
rodo to your $PATH.
- Create a directory for your
$PATHby runningmkdir ~/bin/ - Add your newly-created
~/bin/to your$PATHby runningecho "export PATH=~/bin:\$PATH" >> .bashrc
Adding rodo to your $PATH
Follow the steps below to add the rodo.rkt file to your $PATH.
Tip: If you prefer to use an executable, rather than a wrapper (see the note after step one below to see what a "wrapper" is), you can create an
executable binary file with raco exe rodo.rkt when in the same folder as the
rodo.rkt file. If you are having trouble with the raco exe command, refer to Racket's
documentation regarding the creation of standalone executables.
- Create a file in your
~/bin/directory with the following contents in it:
#!/usr/bin/env bash
racket ~/path/to/rodo.rkt "$@"
Note: The file created above is called a "wrapper". This is a script that
runs the rodo.rkt file through the Racket interpreter. If you wish to
directly run rodo as an executable from your $PATH, see the tip above
For example: If you downloaded the project to your ~/downloads/ folder you would change the line
racket ~/path/to/rodo.rkt "$@" to racket ~/downloads/rodo/rodo.rkt "$@".
-
Save the file
-
Make the file executable by running
chmod u+x ~/bin/name-of-your-file
Usage
Type rodo plus one of the commands below with a space
between rodo and the command.
-h or --help - Displays the help message
init - Creates a file called todo.txt in ~/.rodo/ by default
Note: The directory and filename can be changed by modifying the config.rkt file
ls - Displays numbered items in the todo list
add - Adds an item to the todo list
rm - Removes an item from the todo list
Note: You may have to run rodo ls to see which number corresponds to which item when removing items.
Usage examples
The examples below assume that you have rodo set up in your $PATH in your $PATH
rodo -h
rodo --help
rodo init
rodo ls
rodo add "this is a task"
rodo add this is a task without quotes
rodo rm 1
Note: You may have to run rodo ls to see which number corresponds to which item when removing items.
Configuring rodo
Caution: Change the config.rkt file at your own risk, as it may break things!
Right now, the configurations can be found in the config.rkt file. Settings,
such as the program name, directory, and the filename of the todo list file can
be changed.