rodo
A minimal to-do list program for people who live on the command line.
Screenshot
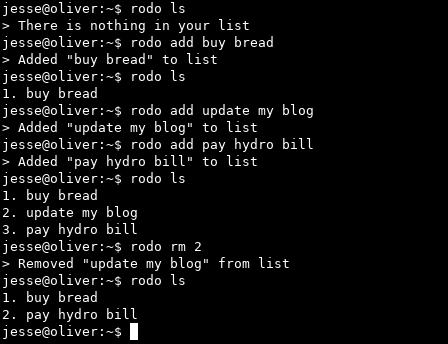
Table of Contents
- TL;DR
- New features
- To-dos
- Platforms
- Installing rodo
- Setup
- List of commands
- Usage examples
- Configuring
rodo
TL;DR
- Make sure Racket is installed
git clone https://github.com/m455/rodointo a directory of your choicecdinto therododirectory- Choose one of the options below for running
rodo.- To use
rodousing the Racket interpreter run:racket rodo.rkt - To use
rodoas an single-file executable follow the two steps below:- Run
raco exe rodo.rktto compile therodointo a single-file executable - Run
./rodo
- Run
- To use
- (optional) Add the following to your
$PATHdirectory to runrodofrom anywhere.
#!/usr/bin/env bash
racket ~/path/to/rodo.rkt "$@"
Note: If you made an executable, remember to change the rodo.rkt part above to rodo
Platforms
Below is a list of platforms that rodo can run on.
- Windows Subsystem for Linux
- GNU/Linux
- macOS (Untested)
Installing rodo
This section will guide you through installing rodo, so you can use it on your platform.
Requirements
This section will provide you with the requirements needed to run rodo. This
section will guide you through downloading Racket and downloading the rodo
source code.
- Racket 6.x
rodosource code
Downloading Racket
Racket can be download using your machine's package manager. Depending on what
package manager you use, commands may vary. See the two sections below for a
list of examples using the apt and pacman package managers on the command
line.
To download Racket using apt
- run
sudo apt install racket
Note: You may need to run this command as root
To download Racket using pacman
- run
pacman -Syu racket
Note: You may need to run this command as root
Downloading the rodo source code
The rodo source code is available from this repository, and can be downloaded using git.
To download the rodo source code
- run
git clone https://github.com/m455/rodo
Tip: If you want to download this into a different directory, you can specify a directory by running the command below:
git clone https://github.com/m455/rodo your-directory-name/
Setup
For convenience, rodo can be added to your $PATH. This section will guide
you through setting up a $PATH and adding rodo to your $PATH.
Setting up a $PATH
A $PATH is a directory in which you can place executable files or script files. These files
can then be ran from any directory on your machine.
Tip: If you have set up a $PATH already, then skip to the next step, Adding
rodo to your $PATH.
To set up a $PATH
- Create a directory for your
$PATHby runningmkdir ~/bin/ - Add your newly-created
~/bin/to your$PATHby runningecho "export PATH=~/bin:\$PATH" >> .bashrc
Adding rodo to your $PATH
Adding rodo to your $PATH allows you to run rodo from any directory on your machine.
To add rodo to your $PATH
- Create a file in your
~/bin/directory with the following contents in it:
#!/usr/bin/env bash
racket ~/path/to/rodo.rkt "$@"
For example: If you downloaded the project to your ~/downloads/ folder you would change the line
racket ~/path/to/rodo.rkt "$@" to racket ~/downloads/rodo/rodo.rkt "$@".
- Save the file
- Make the file executable by running
chmod u+x ~/bin/name-of-your-file
Tip: Racket can make executables. You can do this by running the following
command when in the same folder as the rodo.rkt file:
raco exe rodo.rkt
List of commands
This section lists and describes rodo's commands.
-hor--helpdisplays the help messageinitcreates a file calledto-do.txtin~/.rodo/by defaultlsdisplays numbered items in the to-do listaddadds an item to the to-do listrmremoves an item from the to-do list
Note: You may have to run rodo ls to see which number corresponds to which item when removing items.
Usage examples
The examples below assume that you have added rodo to your $PATH.
rodo -h
rodo --help
rodo init
rodo ls
rodo add "this is a task"
rodo add this is a task without quotes
rodo rm 1 (This removes the first item in your to-do list)
Note: You may have to run rodo ls to see which number corresponds to which item when removing items.
Configuring rodo
Caution: Changing the config.rkt file should be done at your own risk as it may break rodo's functionality
Right now, the configurations can be found in the config.rkt file. Settings,
such as the program name, directory, and the filename of the todo list file can
be changed.
New features
Now the default directory and todo list file have better default permissions:
rodois now licensed under AGPL3!~/.rodo/is set to 700 by default~/.rodo/to-do.txtis set to 600 by default.
To-dos
When I have time, I plan on adding the following features to rodo:
- Add a purpose, context, and overview for each h1 in
README.md - A boolean color option in the
config.rktfile - Encrypt/decrypt
to-do.txtfile